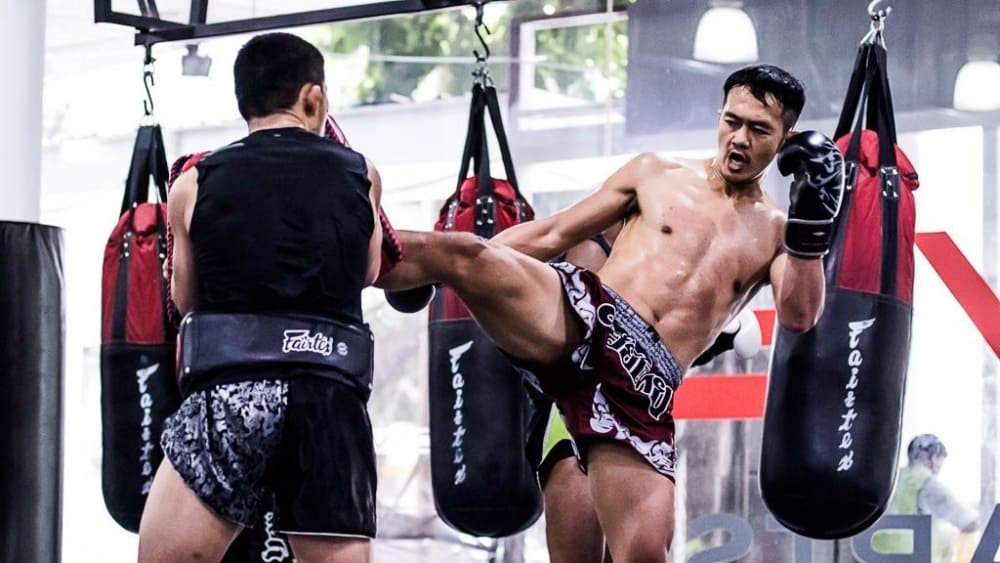
Every Muay Thai gym teaches basics in roughly the same sequence, and that sequence is not random. It follows how the body learns balance, then range, then power, then the closer-quarters skills that require both. This article lays out the ten moves beginners typically learn first, in the order coaches actually teach them, with the common mistake and a drill for each one. Use it as a roadmap to check your own progress against.
This is not a highlight reel of flashy techniques. It’s the boring, repeatable foundation that everything else in the sport sits on top of. Skip a step and the moves above it get shaky. That’s the whole argument for why order matters, and it’s worth spelling out before getting into the list itself.
Why Order Matters
Muay Thai is taught bottom-up: stance and balance first, then hand strikes that don’t require balance under load, then kicks that do, then the mid-range tools like elbows and knees, and finally clinch work, which depends on everything before it. A beginner who tries to learn elbows before their stance is solid usually gets caught off-balance mid-strike. Someone who works on sweeps before they can hold a clinch grip just gets swept themselves.
There’s also a safety logic here. Kicks come before elbows and knees because kicks are lower-risk to drill at speed. Elbows are covered but sharp, and most gyms restrict live elbow sparring until a student has enough control not to cut a partner by accident. Knees and clinch work come near the end because they require the conditioning and body awareness built by the eight moves before them. None of this is arbitrary tradition. It’s risk management dressed up as curriculum.
1. The Stance
The Muay Thai stance is narrower than a boxing stance, with the lead foot turned slightly in and weight distributed close to 50/50 between both legs. It looks simple. It is not.
The most common beginner mistake is squaring the hips too much toward the opponent, which telegraphs kicks and knees before they land and leaves the groin exposed. The second is standing too flat-footed, which kills the ability to check a kick or step offline.
Drill for this one: five minutes of shadowboxing in front of a mirror, moving forward, back, and laterally without ever crossing the feet. No strikes yet, just movement. Anyone who has read the beginner’s guide to Muay Thai training will recognize this as step one for a reason.
2. The Jab
The jab is the lead-hand strike thrown to measure range, set up combinations, and disrupt an opponent’s rhythm. In Muay Thai it’s used less aggressively than in Western boxing, more as a rangefinder than a fight-ending tool.
Beginners tend to drop the rear hand while jabbing. The chin stays open to a counter as a result. They also lean forward with the head instead of extending through the shoulder, which kills power and balance at the same time.
Drill it on focus mitts. A partner calls single jabs at random intervals, and the student resets to stance after each one. Rushing this stage backfires later, since a sloppy jab becomes a sloppy 1-2 becomes a sloppy entry into everything else.
3. The Cross
The rear-hand cross generates more power than the jab because it travels through a full hip rotation. It’s the first strike where beginners actually feel their legs doing the work, not just the arm.
The main error is throwing the cross as an arm punch, without turning the rear hip and pivoting the back foot. Some students also drop the lead hand while throwing it, which is the same chin-exposure problem as the jab, just from the other side.
A simple drill: jab-cross on the heavy bag, ten rounds of thirty seconds, focusing only on hip rotation and foot pivot, not speed. For anyone curious how Muay Thai hand strikes compare to a boxer’s, the piece on boxing in Muay Thai as a fusion of styles covers that overlap in more depth.
4. The Teep (Push Kick)
The teep is a straight kick delivered with the ball or heel of the foot, aimed at the opponent’s midsection or hip to create distance or interrupt their approach. It looks almost lazy compared to a roundhouse kick, and that’s exactly why it gets taught fourth: it teaches balance on one leg without the rotational complexity of a kick that travels sideways.
Beginners chamber the knee too low, which turns the teep into a slow, telegraphed push rather than a sharp strike. Others lean back afterward instead of recovering into stance, leaving them off-balance for a follow-up.
Drill it against Thai pads, ten teeps per leg, focusing on snapping the kick back to stance immediately after contact rather than letting the leg hang.
5. The Roundhouse Kick
This is the signature Muay Thai kick, thrown with a rotating hip and landing with the shin rather than the foot. It’s also the move that takes longest on this list to look decent, and that’s not a coincidence. Balancing on one leg while rotating the hips and swinging the other through a wide arc is a lot to coordinate at once.
The single biggest beginner mistake is kicking with the foot or instep instead of the shin, which hurts and does far less damage. A close second is failing to pivot the standing foot, which caps power and strains the knee over time.
Drill it slow on a heavy bag first, checking the pivot foot after every rep, then add speed once the mechanics hold up. The guide to shin conditioning is worth reading early, since a shin that hasn’t been conditioned makes full-power kicks genuinely painful and slows this whole stage down.
6. The Check
Checking is the defensive answer to the roundhouse kick: lifting the shin to block an incoming kick with bone rather than absorbing it with the leg or ribs. It’s taught right after the roundhouse kick because a student needs to understand the strike before they can reliably defend it.
Most beginners check too late. The leg lifts only after the kick has already started to land, instead of anticipating it. Others check with a bent knee pointed the wrong direction, and that angle does little to actually stop the impact.
Drill it with a partner throwing slow roundhouse kicks to the outer thigh. The checker practices lifting the knee and rotating the shin into the strike on each rep. Anyone building general lower-leg durability alongside checking should look at options for ankle support and bracing; a rolled ankle from a bad check can set training back for weeks.
7. The Elbow
Elbow strikes come next because they demand the balance and hip control built over the previous six moves. There are several variations, horizontal, upward, downward, but beginners generally start with the horizontal elbow thrown off a short pivot.
The most common mistake is winding up before throwing it, which telegraphs the strike from several feet away. The second is throwing it with the shoulder alone instead of rotating through the hip and core, the same power source as the cross.
Drill it slow and controlled on pads, focusing on a short, tight arc rather than a big swing. This is one of the few moves where slower reps genuinely build better habits than fast ones early on.
8. The Knee
The knee strike, usually a straight or curved knee thrown from close range, is where striking starts to blend into clinch range. It’s taught after elbows because it often gets thrown in combination with a grip on the opponent’s neck or shoulders, which itself depends on balance skills from every move before it.
Beginners tend to lean back when throwing a knee, which strips the strike of most of its power and puts them off-balance if the opponent counters. They also forget to pull the target toward the knee rather than just extending the leg forward.
Drill it on Thai pads holding a light neck-and-shoulder frame, working straight knees in sets of five per side, focusing on pulling the pad into the strike.
9. The Basic Clinch Grip
The clinch grip, typically a double collar tie or a single-side neck grip, is the entry point into Muay Thai’s most distinctive range. It comes ninth because it demands balance, strength endurance, and enough striking awareness to defend while gripping.
New students almost always grip too high, up near the crown of the head, which gives them no leverage and tires the arms fast. They also plant their feet too close together, making it easy for an opponent to off-balance them with a single pull.
Drill it with a partner in a slow, cooperative clinch round, practicing the grip, breaking it, and re-establishing it without throwing strikes yet. The full breakdown in advanced Muay Thai clinch techniques is the natural next stop once this grip feels stable.
10. The Sweep
The sweep, usually executed from inside the clinch by hooking or kicking an opponent’s leading leg while off-balancing them with the upper-body grip, sits last on this list for a simple reason: it needs every skill above it working at once. Grip control, balance, timing, and enough strength endurance to control an opponent’s weight while your legs are busy.
The most common mistake is trying to sweep with the arms alone, pulling instead of combining the pull with a leg action. Beginners also rush the timing, attempting a sweep the instant they get a grip rather than waiting for the opponent’s weight to shift onto the leg being targeted.
Drill it slowly in the clinch, one partner offering no resistance at first, focusing purely on the coordination between the hand pull and the leg hook. Speed and resistance get added only once the mechanics are automatic.
The Learning Timeline Table
These figures are general coaching guidance based on three to four training sessions a week, not a guarantee. Some students move faster, some slower, and that’s normal.
| Move | Weeks to a Decent Level | Drill It With |
| Stance | 1-2 | Mirror shadowboxing |
| Jab | 2-3 | Focus mitts, single-count drills |
| Cross | 3-4 | Heavy bag, jab-cross combos |
| Teep | 3-4 | Thai pads, push-kick reps |
| Roundhouse kick | 6-8 | Heavy bag, slow-to-fast pivot drills |
| Check | 4-6 | Partner slow-kick check drills |
| Elbow | 8-10 | Pads, controlled short-arc reps |
| Knee | 6-8 | Thai pads with neck frame |
| Basic clinch grip | 10-12 | Cooperative clinch rounds |
| Sweep | 10-14 | Clinch drills with zero resistance first |
What You’ll Learn in Your First 3 Months
By the end of a consistent first three months, most students have a functional stance, a usable jab-cross, a decent teep, and the beginning of a roundhouse kick that lands with the shin more often than not. The check is usually still a work in progress, and that’s fine.
Elbows, knees, clinch grips, and sweeps are typically still rough at this point, and they should be. A student who can already sweep confidently at week ten either trained more than average or skipped steps that will show up as gaps later.
The real marker of progress in month three isn’t any single move. It’s whether combinations start feeling connected, jab-cross-teep instead of three separate techniques bolted together. That shift usually happens somewhere between weeks eight and twelve.
Drilling Plan for Self-Study
For students without daily access to a coach, a simple weekly split works: two sessions on hands (jab, cross, combinations), two on kicks and checks, one on elbows and knees against pads, and one dedicated to clinch grip work with a partner. Shadowboxing on off days keeps the stance sharp without adding fatigue.
Speed comes later, not first. The guide to speed training in Thai boxing is worth saving until the ten moves above already have decent mechanics, since speed drilled on top of bad form just locks in the bad form faster.
Anyone who wants the bigger picture, why these ten moves sit inside a much larger system built around eight points of contact, should read the full history and technique guide to Muay Thai. It puts this beginner checklist into context against the sport’s broader toolkit.
FAQ
Do I need to master one move before starting the next? No. Gyms teach these in layers, not in strict sequence. A beginner might be drilling the cross while still smoothing out their stance. The order matters more for which moves get heavy focus each month than for a hard gate between them.
Why do elbows come so late if they’re not physically harder than kicks? Safety, mostly. Elbows cut, and most gyms won’t let a student throw them at speed or in sparring until their control and awareness are solid enough not to injure a partner by accident.
Is three months realistic for all ten moves? Realistic to see all ten, yes. Realistic to have all ten polished, no. Three months usually means a solid stance, hands, and teep, a developing kick, and rough early versions of everything else.