
Hand wraps protect the small bones and tendons in the hand before any glove goes on, and in Muay Thai they do a second job boxing wraps don’t: keeping the wrist stable while still letting it bend for clinch grips. Skip the wrap, or wrap it badly, and the risk isn’t soreness. It’s a broken metacarpal from a bag session that should have been routine. This guide walks through the wrap itself, step by step, in plain language, so a beginner can do it correctly the first time without watching a video on loop.
What You Need
A pair of wraps, roughly 180 inches long for most adults, though 120-inch wraps work for smaller hands or shorter training sessions. Look for a thumb loop sewn into one end and a velcro closure at the other. That’s the entire list. No tape needed if the wrap has velcro, though some fighters add a strip of athletic tape over the velcro for extra security during hard sparring.
Step-by-Step Wrap
Lay the wrap flat and find the loop at one end before starting. Work slowly the first few times. Speed comes later, once the pattern is memorized in the hands rather than the head.
- Slide the thumb through the loop, palm facing down, fingers spread slightly apart.
- Pull the wrap across the back of the hand toward the wrist.
- Wrap around the wrist three full times, snug but not tight enough to numb the fingers.
- Bring the wrap diagonally across the back of the hand, up toward the base of the thumb.
- Loop it once around the base of the thumb, then cross back over the hand toward the wrist.
- Wrap around the wrist once more to reset the tension.
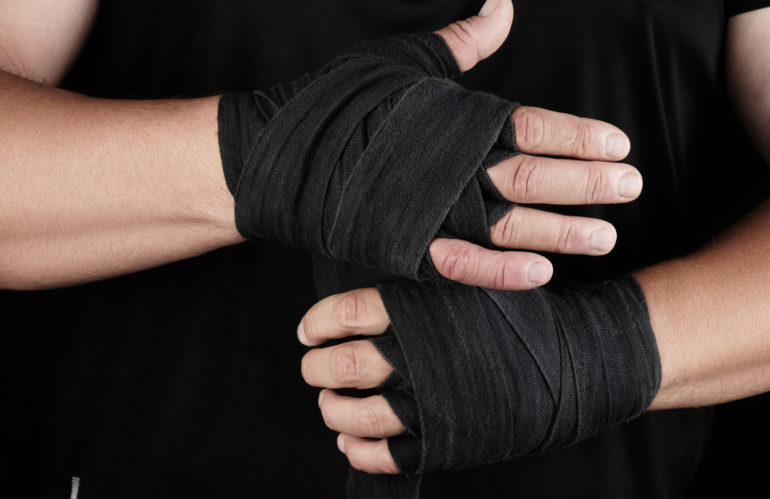
- Start the finger-separator pattern: bring the wrap between the pinky and ring finger, across the back of the hand, then between the ring and middle finger, then between the middle and index finger. Each pass crosses the back of the hand in an X shape.
- Once all three gaps are covered, wrap around the knuckles two to three times, covering the entire striking surface evenly.
- Cross diagonally back over the knuckles once, reinforcing the exact spot that lands on pads, bags, or an opponent’s shin.
- Circle the thumb one more time if wrap material remains. This locks the earlier thumb loop in place and stops it from sliding.
- Finish with any leftover wrap around the wrist, layering it flat rather than bunched.
- Press the velcro closure down flat against the wrist, then make a full fist and open the hand completely. Fingers should close all the way with no restriction and no numbness.
If the fist doesn’t close all the way, the wrap is too tight around the knuckles. If the wrist feels loose when pushed against a wall, it needs another pass around the wrist before the knuckle section. Redo it. A rushed wrap on the first attempt is normal.
Muay Thai vs Boxing Wrapping
Boxers wrap for one motion: the punch. A tight, immobile wrist locks the joint straight for maximum transfer of force on a straight or hook. Muay Thai fighters need that same knuckle protection, but they also clinch, and clinch work bends the wrist constantly while grabbing the neck or arms of an opponent. Wrap the wrist too rigidly and it either loses effectiveness during clinch entries or, worse, strains against the wrap’s edge repeatedly until it chafes or restricts blood flow.
The fix is more figure-eight passes around the palm and fewer rigid straight-wrist locks than a boxing wrap typically uses. The wrist still gets support, three to four wraps is standard, but the fighter should be able to flex the wrist forward and pull it back without the wrap digging in. Test this before gloving up: make a grabbing motion, like pulling someone’s head down, and check nothing pinches.
Wrap Length and Types
Two lengths dominate: 180 inches and 120 inches. The 180-inch wrap covers more of the hand and wrist, which most Muay Thai gyms recommend since the sport adds clinch stress on top of striking. The 120-inch wrap suits smaller hands, kids, or fighters who prefer a lighter, less bulky wrap under smaller gloves.
Cotton wraps are the traditional choice. They’re cheap, breathable, and wash well, but they lose tension over a long session and need to be rewrapped for a second round of sparring. Elastic wraps, sometimes labeled semi-elastic or Mexican-style, hold their tension longer and mold to the hand better, which matters most during clinch drilling where the wrist moves constantly. Elastic wraps also cost more and take slightly longer to master, since over-stretching them cuts off circulation without the wearer noticing right away.
Quick Wraps: When They’re OK
Gel wraps and wrap-gloves, the kind with a built-in elastic sleeve and velcro strap, skip the entire process above. They take ten seconds to put on. For light bag work, shadowboxing, or a beginner’s first few classes before technique matters as much as protection, they’re a reasonable shortcut. They fall short once contact gets heavier: sparring, pad rounds with real power, or any clinch work, because they don’t compress the knuckles evenly or lock the wrist the way a full wrap does. A fighter training three or more times a week should learn the full wrap early rather than leaning on gel wraps as a permanent habit.
How Fighters Get Wrapped Before Real Fights
In Thailand, fighters don’t wrap their own hands before a real fight. A trainer or cornerman does it, seated next to the fighter in the dressing room, usually less than an hour before the walk to the ring. This isn’t tradition for its own sake. Commissions and promoters require it because loose wraps have been used in the past to hide items pressed into the palm, plaster, resin, or anything else that turns a punch into something closer to a weapon. An official or opposing cornerman is often allowed to watch the wrapping happen, and in many venues the wrapped hands get initialed or taped by an inspector afterward so nothing can be added once the gloves go on.